Thursday, June 23, 2016

Mind blowing tip for child in pull-ups!


Changing your child's pull up can be time consuming. This tip blew me away. 
Maybe moms know about this trick, but I didn't.
I have 2 teenage girls and wish I knew this when they were toddlers.

I worked in a classroom for children with special needs. A couple of the kids were in pull ups and we needed to assist them in the bathroom. If one of the kids had an accident and the pull-up needed to be changed, I took off their shoes, then pants, put the pull up on, then pulled up pants and then put shoes back on. This was difficult at times because one of my kids had an AFO brace. Sometimes I would have to take off the brace if they had on tight fitting pants. 

 It was such a long process!

A new person was hired for our classroom and I was showing her what we do with the kids. She said, "there is a much easier way to change the pull up." (She used this technique when she worked in day care.) As she demonstrated the technique, I was blown away. This was life changing. Why did I not know this? I could have been using this with my own kids. 
I will try to explain.


Technique


1.  Pull down child's pants or shorts to knee level. No need to remove shoes.  No need to remove a leg brace if they wear one.

2.  Rip sides of pull-up to remove.

3.  Take just ONE leg out of their pants.

4.  (This is the step that is hard to explain without a video.) With pants still on the one leg of the child, start to put the pull-up on as you usually would...(over the pants).  Take "the other leg of the pants" and push it down through the same opening with "the pants on the leg." (confusing I know)

5.   You now can pull "pull-up" all the way.

6. Slip leg of the pants onto the other leg of the child and pull up! Your done. (You may need to take off their shoe depending on how wide the pant leg is.)

I hope this tip helps. I was completely naïve about this. This tip would be good for elderly people as well who wear Depends.


Monday, June 20, 2016

The Best Ketchup Ever! 78 Red Company


Yesterday we went to the Chicago Dough Company for dinner and I had the best ketchup. It is on the sweeter side, and thick. It has no high fructose corn syrup and is all natural. This will definitely be in my house from now on. #78RedCo
78 Red Ketchup

Thursday, May 26, 2016

Baby Bonnets, Sun Hat

One of my favorite things that was given to me was a handmade crocheted bonnet for my first born daughter. I don't see bonnets in stores anymore and wish I had a real baby to model for me! Lol! Thanks for looking.


Saturday, March 12, 2016

Basketball Oreo Pops


I run the concession stand at my daughter's school and today is the semifinals of the girls basketball tournament. I have been wanting to make oreo pops for awhile now and thought of making them into basketballs. I'm going to sell them at the stand today.


The pops were a bit difficult to make. The biggest issue was the cookie falling off of the stick when dipping into the melted chocolate. After doing some research, the trick is to open up the cookie, dip the end of the stick in the melted chocolate then sandwiching the cookie back together over the stick. The melted chocolate acts like glue. Would I make these again? Probably, but it doesn't look as easy as originally thought.


Tuesday, January 12, 2016

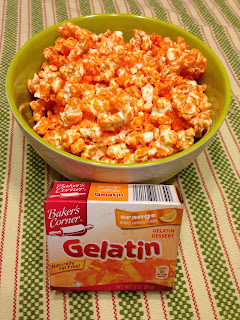
Jello Flavored Popcorn


One of my favorite snacks as a child was Jello flavored popcorn. My mom would make different flavors and it didn't last long in our house with 4 kids! This would make a great Super Bowl Party snack. Just choose the colors of your favorite team and find a flavor of Jello that matches!


Jello Flavored Popcorn


(I'd triple or quadruple this recipe for a party)

8-12 cups air popped popcorn

1/4 cup butter or margarine
1/2 cup sugar
1 small box of flavored gelatin
3 tablespoons of corn syrup

In a small pot melt butter, add sugar, gelatin and corn syrup. Stir constantly until sugars are dissolved. In a large bowl, add 12 cups of air popped popcorn making sure there are no kernels. Pour jello mixture over the top of the popcorn and stir until coated evenly. Pour out popcorn onto a parchment or aluminum lined baking sheet. Bake in a 300 degree oven for 10 minutes. Cool completely. Enjoy!

Tuesday, December 22, 2015

Pumpkin Roll Recipe

My father-in-law asked me to make my pumpkin roll for Christmas this year. Here is a recipe that I have been using for years. I will upload a picture of the roll on Christmas Day.

Pumpkin Roll

(Makes one pumpkin roll)

3 eggs
1 cup of sugar
2/3 cup of pumpkin puree

Beat eggs until fluffy. Add sugar slowly and then pumpkin puree.

In a separate bowl, whisk together...
3/4 cup of flour
1 tsp. baking powder
2 tsp. cinnamon
1 tsp. ginger
1/2 tsp. nutmeg
1/2 tsp. salt


Fold flour mixture into pumpkin mixture. Place a sheet of parchment paper in a 15 by 10 by 1 inch jelly roll sheet. Spray parchment paper with Pam. Spread mixture onto parchment paper. Bake 375 degrees for 12-15 minutes. Let cool 5 minutes. Take a clean dish towel and put cake on top. roll up from the short end and let cool.

Mix 1 8 oz. package of cream cheese, 3 tsp butter, 1 cup of powdered sugar, 1 tsp vanilla. When cake is cool, unroll from towel, spread onto top and re-roll. sprinkle with powdered sugar upon serving.


Friday, July 3, 2015

Double Mailbox Post Makeover


Completed project!


Updated photos from 2/2018, closer view


view from underneath


My neighbor's mailbox and ours were in just terrible condition. The mailboxes had a wooden cover where the birds loved to perch and poop all over them. I asked my neighbor if he would be interested in sharing a double mailbox post with identical mailboxes and he agreed. Little did I know that none of the major home improvement stores sell a double mailbox post, unless you want to special order one for hundreds of dollars or have one custom made.  This project cost about $100, split between the two of us...$50 each, not too bad!

Materials needed...
Wooden post from Lowes-ours is not listed online but very similar to this one
1- 1 by 6 piece of wood  approx. $5
screws

Mailboxes must be placed 6 to 8 inches away from the curb; the slot or door must be 41 to 45 inches from the ground. Curbside mailbox posts should be buried less than24 inches deep and made from wood no larger than 4 inches high by 4 inches wide.


We installed the post with guidelines from the USPS (see above) and then put about a 5 by 22 inch cross piece to set the mailboxes on. The size of that piece of wood will depend on the size of your mailboxes and how close you want them together. If you have any questions on how we installed it, comment below.